Getting Started:
1. Turn audio on
2. Load a wave file
3. Select the part of the wave you want to scratch
4. Scratch!
Sections in this Guide:
1. The Main View
2. The Record Movement Editor
3. The Crossfader Editor
4. The File Browser
5. The Midi Editor
6. Musical Editing
7. Scratch Saving and Pasting
8. Rewire Quick-start Guide
1. The Main View
2. The Record Movement Editor
3. The Crossfader Editor
4. The File Browser
5. The Midi Editor
6. Musical Editing
7. Scratch Saving and Pasting
8. Rewire Quick-start Guide
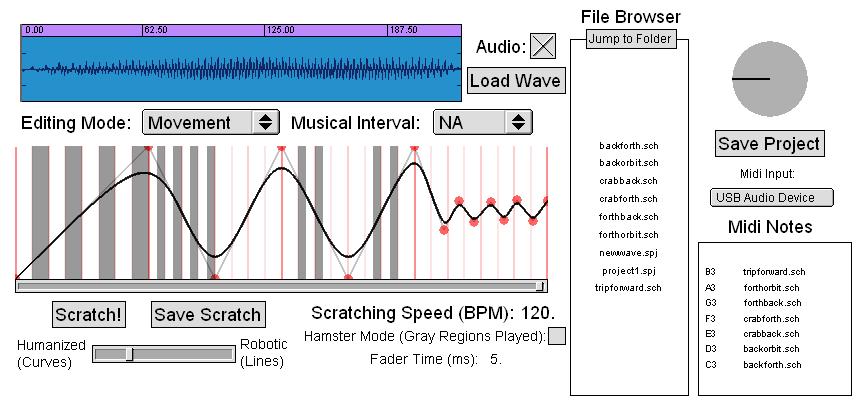
The Main View
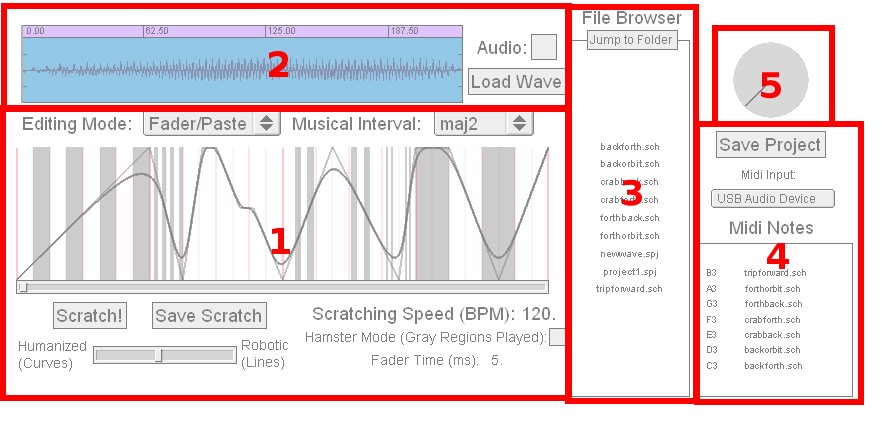
1: Scratch Editor - Used for editing scratches and crossfader movements
2: Wave File Viewer - Used to select the region of the wave file to scratch
3: File Browser - Used for loading projects, scratches, and waves
4: Midi Editor - Used for assigning scratches to midi notes
5: Record Player - Shows a little animation of record motion during playback
Key Shortcuts for Main View:
X: Toggle Scratch Editor between Record Movement and Crossfader/Paste Edit Modes
S: Save a scratch file
O: Open a folder for loading/saving scratches and projects
K: Erase current scratch and start a new one
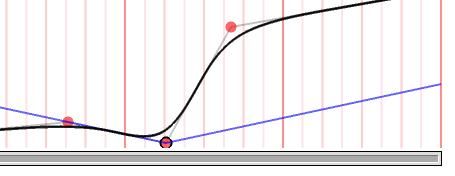
The Record Movement Editor
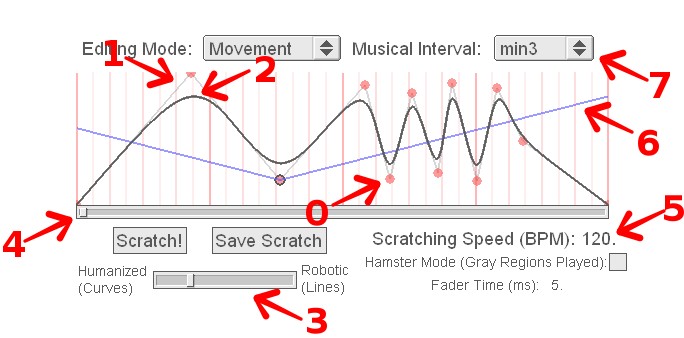
0:
Breakpoint - Used to draw and change scratches
1: Line segments - Shows robotic version of scratch
2: Scratch Curve - Shows an approximation of actual hand motion
3: Smoothness Control - Adjust between smoother record motion and exact precision
4: Scratch Playback Position - Shows the current position in the scratch
5: Scratching Speed - How fast the scratch plays back in beats per minute. The editor displays 4 beats.
6: Music Interval Lines - Show the slope needed to playback a specific note value (refer to musical editing section)
7: Current Interval - The current scale interval relative to normal-speed playback (refer to musical editing section)
This graph shows everything that happens as far as record motion. Think of it as a recording of hand motion on a turntable. As the hand moves up, so the does the curve on the graph. If the curve wiggles back and forth, then so will the record. The steeper the curve is, the faster the record will be moving.
Changing the Scratch Curve
There are two
factors that control the actual record motion. The first is the curve
itself (shown by #1 and #2), and the second is the Smoothness Control
(#3).
The curve is edited with a simple breakpoint editor (breakpoints are shown by #0). To add a point anywhere, simply left click and a new point will be created. Any point can be further moved by clicking and dragging it again later. To remove a point simply right click it.
The Smoothness Control changes how robotic, or perfect, the hand motion is. With smoothness set to the most robotic, the scratch curve will become entirely rigid line segments (#1). Any changes in hand motion will have perfect transitions. Moving smoothness to the human side makes the hand motion much more realistic and relaxed (#2). The curved settings are much more useful for realistic slow scratches, and the more robotic settings work better for making scratches that are either incredibly fast or make intense use of melodic scratching (refer to musical editing section)
Lastly the Scratching Speed (#5) sets how quickly the scratch is played back. The scratch graph is made to show four beats, played back at the Scratching Speed BPM. Lowering the scratching speed will slow down the hand motion speed, and also cause the pitch of everything within the scratch to drop.
The Crossfader Editor
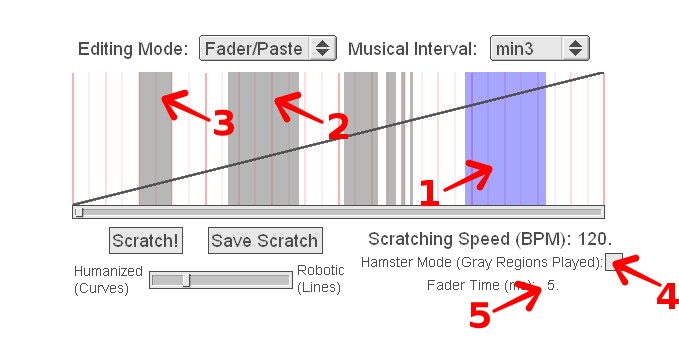
1:
Selected Region - Shows selected area
2: Fade Region - Shows where crossfader is "off"
3: Beat Locked Fade Region - Shows a crossfader "off" region created by holding shift while selecting
4: Hamster Mode Toggle - Toggles between gray regions being "off" and white regions being "off"
5: Crossfader Transition Speed - How fast the crossfader goes from "off" to "on" or vice versa
Editing the
crossfader movement is much simpler than scratch editing. Any area can
be selected with a simple click+drag, and then turned on or off. To snap selections to the grid, hold down the Shift key while selecting. The
keyboard keys to move the crossfader are:
A: Make selection gray ("off")
D: Make selection white ("on")
In default mode the gray regions (#2) show where the crossfader is off, and the white regions show where it is on. In hamster mode (#3) these two colors switch functions, and the white regions become the "off" regions.
The Fader Time (#4) controls how fast the crossfader moves between off and on. In real life this will vary depending on hand speed and DJ mixer, so here it is completely adjustable from instantaneous to as long as anyone could possibly need. Setting it too low will cause noticable clicking in the scratching sound, because it will make transitions faster than physically possible.
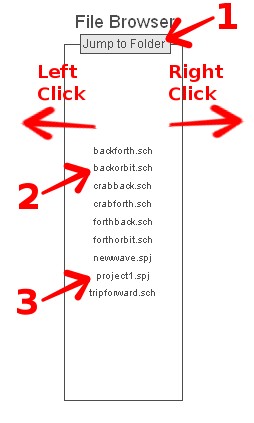
1: Jump to Folder - Changes current folder
2: Scratch Files (.sch) - Files of crossfader and record movement data
3: Project Files (.spj) - Files that store midi note settings and the current wave file
The File Browser is used for loading scratch and project files. It will display all the scratch, project, and wave files in a given folder. The folder can be changed by the "Jump to Folder" button (#1).
Scratch files can be sent to two different places. Left clicking a scratch in the browser will send it to the Scratch Editor. If no region is selected in the Fader Editor then the scratch will over-write whatever is currently in the Scratch Editor. If a region IS selected, however, the scratch will import as a scaled version over-writing only the selected area. If this sounds confusing, it is explained in further detail in the Scratch Saving and Pasting section.
Right clicking a scratch file sends the scratch to the Midi Editor. Here it will be associated with a midi note. For more information on the Midi Editor and project files, check the Midi Editor section.
The File Browser can also be used to load wave files with a single click. If there is a directory of wave files to preview, it is much faster to load them through the File Browser than to load each using the "Load Wave" button.
Midi Editor
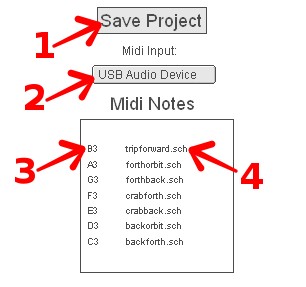
1: Save Project Button - Brings up dialog box to save current midi settings to a file in the current file browser folder
2: Midi Input - Used to select midi input device, such as Rewire or a USB midi controller
3: Scratch Note Name - The midi note that will trigger a given scratch to play
4: Scratch File Name - The scratch file that will be triggered by the corresponding midi note
The midi editor is designed to be fast. To associate a scratch with a midi note, simply follow these two steps:
1) Play the desired midi note on the current midi controller
2) Right click a scratch in the File Browser
The scratch file name will then show up in the midi editor to the right of that midi note. The scratches are always sorted in order according to their midi note, with the current highest note stationed at the top. Once a scratch is in the Midi Editor, playing the corresponding note again on the current midi controller will trigger that scratch to load and play.
As an additional note: scratches already associated with midi notes can be moved around to different notes inside the editor by clicking and dragging.
Musical Editing
A: Make selection gray ("off")
D: Make selection white ("on")
In default mode the gray regions (#2) show where the crossfader is off, and the white regions show where it is on. In hamster mode (#3) these two colors switch functions, and the white regions become the "off" regions.
The Fader Time (#4) controls how fast the crossfader moves between off and on. In real life this will vary depending on hand speed and DJ mixer, so here it is completely adjustable from instantaneous to as long as anyone could possibly need. Setting it too low will cause noticable clicking in the scratching sound, because it will make transitions faster than physically possible.
1: Jump to Folder - Changes current folder
2: Scratch Files (.sch) - Files of crossfader and record movement data
3: Project Files (.spj) - Files that store midi note settings and the current wave file
The File Browser is used for loading scratch and project files. It will display all the scratch, project, and wave files in a given folder. The folder can be changed by the "Jump to Folder" button (#1).
Scratch files can be sent to two different places. Left clicking a scratch in the browser will send it to the Scratch Editor. If no region is selected in the Fader Editor then the scratch will over-write whatever is currently in the Scratch Editor. If a region IS selected, however, the scratch will import as a scaled version over-writing only the selected area. If this sounds confusing, it is explained in further detail in the Scratch Saving and Pasting section.
Right clicking a scratch file sends the scratch to the Midi Editor. Here it will be associated with a midi note. For more information on the Midi Editor and project files, check the Midi Editor section.
The File Browser can also be used to load wave files with a single click. If there is a directory of wave files to preview, it is much faster to load them through the File Browser than to load each using the "Load Wave" button.
Midi Editor
1: Save Project Button - Brings up dialog box to save current midi settings to a file in the current file browser folder
2: Midi Input - Used to select midi input device, such as Rewire or a USB midi controller
3: Scratch Note Name - The midi note that will trigger a given scratch to play
4: Scratch File Name - The scratch file that will be triggered by the corresponding midi note
The midi editor is designed to be fast. To associate a scratch with a midi note, simply follow these two steps:
1) Play the desired midi note on the current midi controller
2) Right click a scratch in the File Browser
The scratch file name will then show up in the midi editor to the right of that midi note. The scratches are always sorted in order according to their midi note, with the current highest note stationed at the top. Once a scratch is in the Midi Editor, playing the corresponding note again on the current midi controller will trigger that scratch to load and play.
As an additional note: scratches already associated with midi notes can be moved around to different notes inside the editor by clicking and dragging.
Musical Editing
A record can
normally be played back at any speed. With a modern LP this makes for
33 and 1/3 rotations per minute. That means if a record is scratched at
exactly that speed, the sound created will be the same as if the record
was just being played. What if, however, a person wanted to scratch a
bassline from a record that has a bass sample on it? It then becomes a
matter of figuring out the different hand speeds needed to make
different "notes" above and below the original bass sample. This is
where the Musical Editing options of Scratcher come into play.
Any given "note"
is the same as a specific steepness within the scratch curve. By having
the computer do all the math, the slopes for every possible musical
interval in Western music are possible. To
chose an interval simply use the drop down "Musical Interval" menu.
Otherwise, the letters Q through I on the keyboard are used as
shortcuts.
Each key corresponds to the number above it. That is, Q represents the
first note of a major scale, or normal playback speed. W is the second
note
of a major scale, E is the third, and so on. The following chart shows
key combinations and their purposes.
| Key Combination | Musical Interval | Abbr. in Scratcher | Major Scale Value |
| Q | Root | per1 | 1 |
| Shift + W | Minor 2nd | min2 | |
| W | Major 2nd | maj2 | 2 |
| Shift + E | Minor 3rd | min3 | |
| E | Major 3rd | maj3 | 3 |
| R | Perfect 4th | per4 | 4 |
| Shift + R / Shift + T | Tritone | aug4 | |
| T | Perfect 5th | per5 | 5 |
| Shift + Y | Minor 6th | min6 | |
| Y | Major 6th | maj6 | 6 |
| Shift + U | Minor 7th | min7 | |
| U | Major 7th | maj7 | 7 |
| I | Octave | per8 | 8 |
Entering any key
combination within this table will tell Scratcher to calculate the
necessary steepness to make that interval up from the original sample.
For those who know a little music theory, the Shift key is used to make
intervals minor or augmented/diminished.
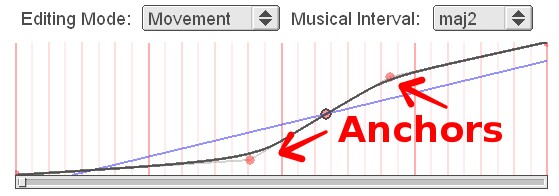
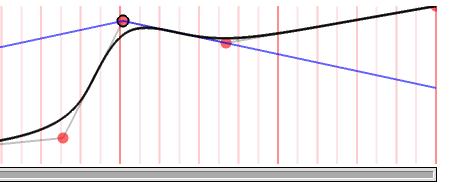
Once an interval is selected, blue lines will show up any time a point is selected. These lines are guides to show the exact steepness needed for that specific interval, or note. To make it easier to follow these guides, there are options to make breakpoints lock to them automatically. The shift and control keys are used to turn on locking. Simply press and hold either of them while dragging a point to force it to the path.
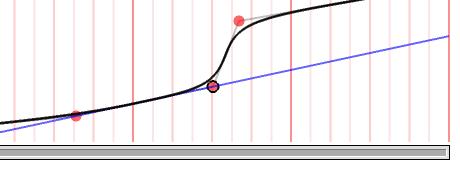
Ctrl: Used to lock relative to the anchor point on the right

As shown, each locking mode has two different directions it can work vertically. One is made to correspond to forward scratches, and the other is for reverse scratches.
Keep in mind that since everything is relative to normal playback speed, anything that changes the playback speed will also effect these slopes. Changing the BPM of playback or selecting a new part of a wave file to play will both have an effect on the musical editing mode line guides.
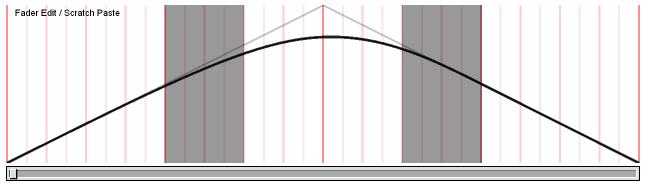
One of the most magical features of Scratcher, is the ability to paste any scratch into another scratch and scale it in time. If that sounds a little confusing, here is an example guide.
First, make a scratch that you'd like to save or paste
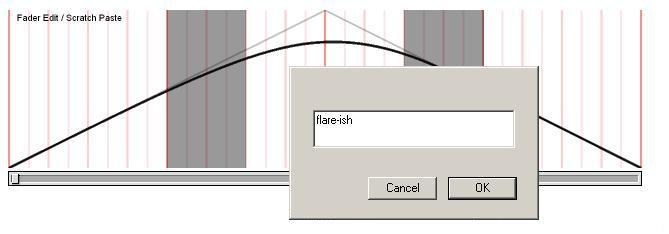
To save, hit the "S" key and a dialogue box comes up for the scratch name
After clicking OK, notice a new addition to the Scratch Library

Your scratch has been successfully saved! Now to work with pasting first open the scratch you want to work on by clicking it in the Scratch Library, or create a new scratch by hitting "K." Here I've used a new blank scratch. Make sure you are in Fader Edit Mode (hit the "X" key to toggle edit modes). Now select the area where you want to insert the scratch you already made, just as if you were going to change the crossfader. In this case, I've chosen to map my scratch across the second beat.
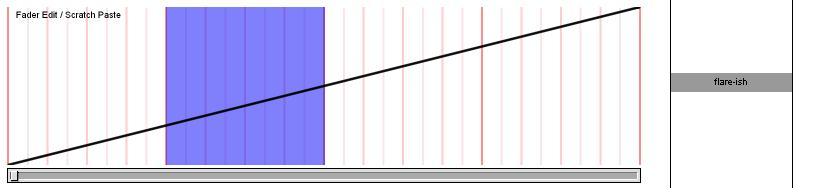
After selecting an area, simply click on the name of the scratch you want in the Scratch Library. It will now be put into the current scratch scaled to fit exactly in the selected area!
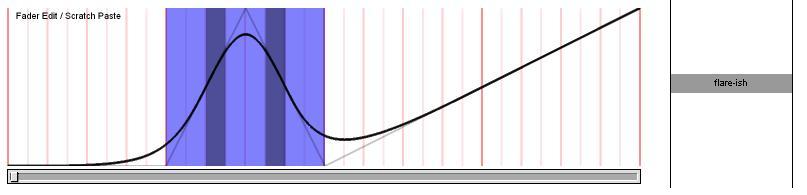
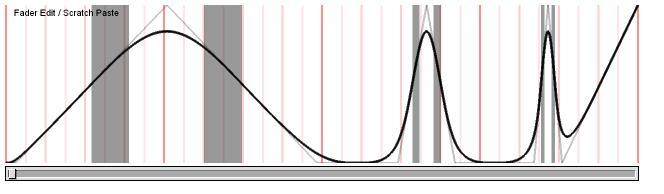
There are really no limitations on where and how you paste it.
Once an interval is selected, blue lines will show up any time a point is selected. These lines are guides to show the exact steepness needed for that specific interval, or note. To make it easier to follow these guides, there are options to make breakpoints lock to them automatically. The shift and control keys are used to turn on locking. Simply press and hold either of them while dragging a point to force it to the path.
Shift: Used to lock relative to the anchor point on the left
Ctrl: Used to lock relative to the anchor point on the right
As shown, each locking mode has two different directions it can work vertically. One is made to correspond to forward scratches, and the other is for reverse scratches.
Keep in mind that since everything is relative to normal playback speed, anything that changes the playback speed will also effect these slopes. Changing the BPM of playback or selecting a new part of a wave file to play will both have an effect on the musical editing mode line guides.
One of the most magical features of Scratcher, is the ability to paste any scratch into another scratch and scale it in time. If that sounds a little confusing, here is an example guide.
First, make a scratch that you'd like to save or paste
To save, hit the "S" key and a dialogue box comes up for the scratch name
After clicking OK, notice a new addition to the Scratch Library
Your scratch has been successfully saved! Now to work with pasting first open the scratch you want to work on by clicking it in the Scratch Library, or create a new scratch by hitting "K." Here I've used a new blank scratch. Make sure you are in Fader Edit Mode (hit the "X" key to toggle edit modes). Now select the area where you want to insert the scratch you already made, just as if you were going to change the crossfader. In this case, I've chosen to map my scratch across the second beat.
After selecting an area, simply click on the name of the scratch you want in the Scratch Library. It will now be put into the current scratch scaled to fit exactly in the selected area!
There are really no limitations on where and how you paste it.